How to Streamline Workflows Using Automations in Infinity
While AI hasn’t made significant progress yet when it comes to walking a dog in the rain or retrieving missing socks from the dryer, the good news is that it can help with some other tedious tasks. Like having to manually enter data in the spreadsheet until you catch yourself typing All work and no play makes Jack a dull boy in column D, row 256.
Infinity automations are designed to save you from having to do the same task over and over again, from adding the Daily Standup to the calendar every morning to dragging archived tasks to the appropriate folder. Now, let’s take a look at how automations can make your life less stressful and go through a couple of examples that will hopefully inspire you to implement something similar.
The Benefits of Using Automations
To those who aren’t exactly tech-savvy, setting up automations might sound like a lot of work. Before showing you that it literally takes a couple of clicks to set everything up, here are some solid reasons to start adding automations to your workflows.
- Save Time—According to Salesforce, IT leaders say that, thanks to automation, employees are saving between 10 and 50% of the time they previously spent doing manual tasks.
- Improve Workflows—If you want things to run faster and smoother, just automate every step that can be automated, like changing the task status or automatically creating recurring tasks.
- Get Important Notifications—Avoid waiting time and get notified as soon as an important update takes place. Automations ensure that nothing important slips through the cracks.
- Reduce Human Error—there’s a reason why humans need breaks but machines don’t. We all make mistakes when tired or distracted, but if you let the software deal with things, there’s nothing to worry about.
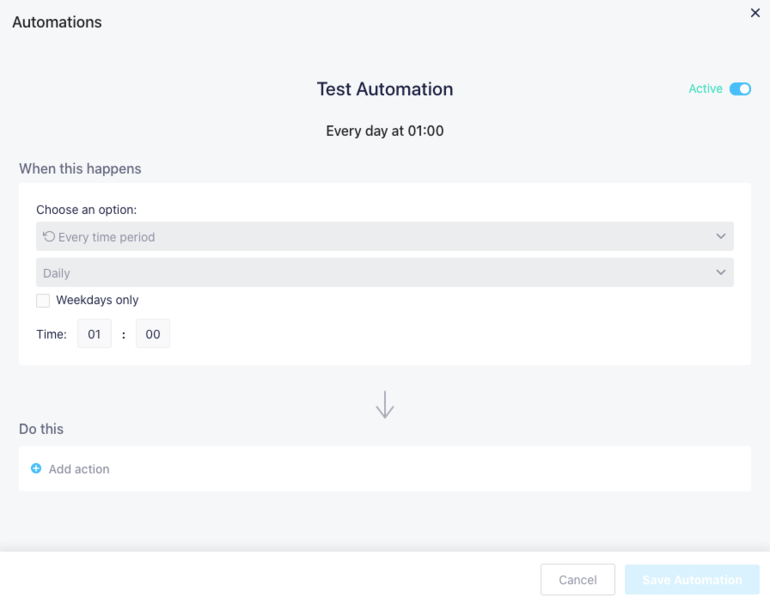
Automation Structure in Infinity
Creating automations in Infinity is as simple as 1, 2, 3. Every automation has a 3-part structure consisting of a Trigger, Condition, and Action, but you can leave out the Condition and make automations with only a Trigger and an Action.
Trigger
There are currently 9 possible triggers in Infinity: attribute value changes, date arrives, any time period, button, folder created, item deleted, folder deleted, item created, and form submitted. Whenever a trigger occurs, the automation will be performed if the chosen condition is met.
Condition
Adding a condition isn’t a mandatory step, but you can add one or multiple conditions if you need to narrow down the trigger. Conditions work just like Filters: you can use attributes like assignees, date created, status, etc. to create specific automations, like sending a notification every time one of your team members marks a task as completed.
Action
Once you have added a trigger and condition, you can choose from 7 different actions: leave a comment, create a folder, create an item, move an item, send a notification, trigger a webhook, and update an item.
By mixing and matching different triggers and actions or by adding conditions to the mix, you can have the freedom to create any automation that makes your workflows run smoother. To demonstrate how you can improve processes by using Infinity automations, we have selected a few common use cases.
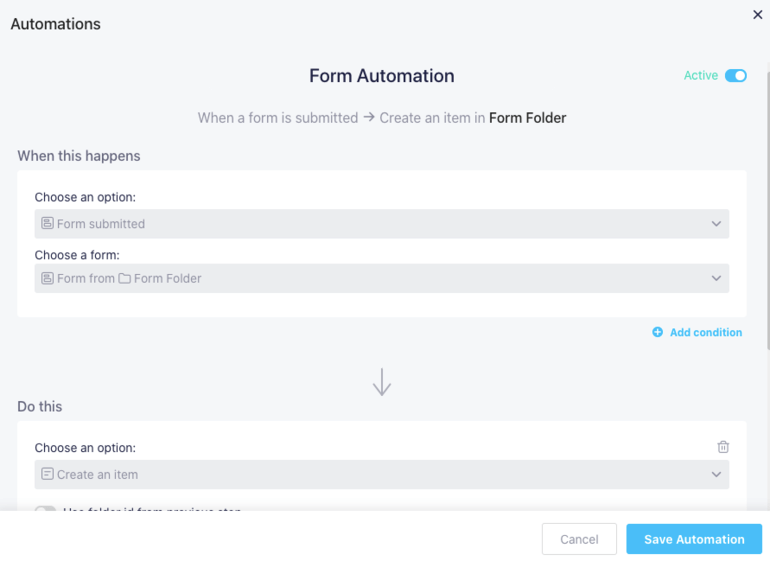
1. Create a New Item When a Form Is Submitted
Collecting data from online forms can be a gargantuan task, especially if you’re dealing with hundreds of submissions. If you ever had to manually copy and paste information from a 10-question form into a spreadsheet, you know how time-consuming this can be. This is why Infinity lets you create automations with a “form submitted” trigger.
There are many ways you can use these automations, depending on the kind of form you have. For instance, if you have a “request a demo” form on your website, it makes sense to create an automation that will make a new task for each submitted form and assign it to the person on the customer success team in charge of the demo calls. Or if you’re using a form for users to report any issues with your product, you can create an automation that will notify the support team every time there is a new issue.
In this example, we’ll make an automation from scratch to show you how to set the right trigger and action if you want to create a new item each time someone submits a form.
- First, click the Automations button in the upper left corner of your Infinity workspace.
- Click the Create Automation button to make a custom automation from scratch.
- Name the automation any way you like so you can reuse it when needed.
- Select Form submitted from the Add the Trigger menu.
- Choose which form you want to apply the automation to. (Note: you need to have at least one form in order to create the automation. If you are yet to make a form, first do that, then return to the automations.)
- Select Create an item from the Add Action menu.
- You can choose to use the folder where the form is located, or select a folder from the dropdown menu.
- Add item details such as name, description, stage, assignees, etc.
- Voila! Your automation is set up and ready for use.
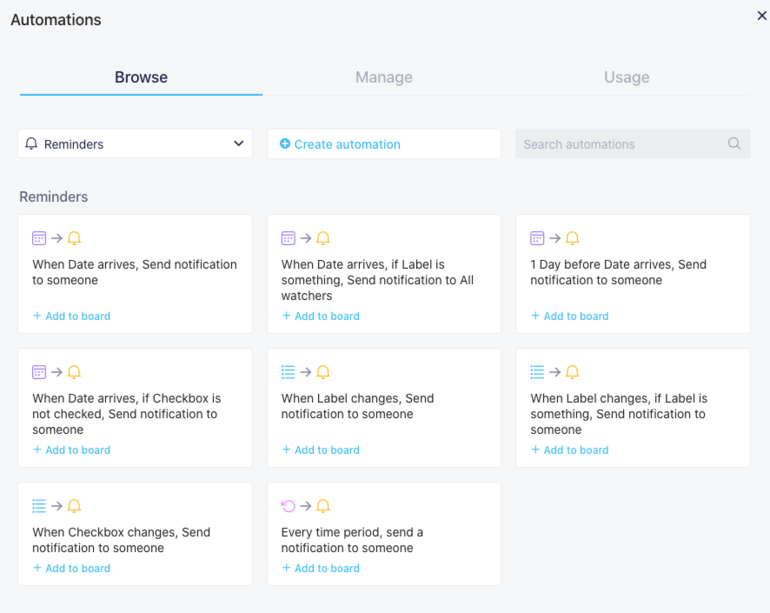
2. Send Reminders for Unfinished Tasks before the Deadline
Have you ever completely forgotten about a task that somehow got buried under a pile of other tasks, only to discover that the deadline was today? If you’re forced to juggle many things at once, upcoming deadline notifications can be a lifesaver. Infinity automations offer a wide selection of actions related to reminders, from recurring notifications to reminders about unfinished tasks.
Instead of having to go through each team member’s tasks to check progress and make sure everything is delivered on time, you can create an automation that will do it for you. In this example, we’ll create an automation that will notify assignees if the task isn’t marked complete a day before the deadline (you can simply change the time to an hour, a week, or any custom time before the deadline).
- Click the Automations button in the upper left corner of your Infinity workspace.
- From the Browse menu, select Reminders.
- Select the When date arrives, send notification to someone automation.
- Choose the date you want from the dropdown menu.
- Choose the time to send the reminder.
- Click Add condition.
- Choose Where ‘status’ is not Done from the menu.
- In the Do this section, pick the team members you want to notify.
- Customize the text of the notification (i.e. The final draft needs to be sent by 2 p.m. today).
- Click Save Automation.
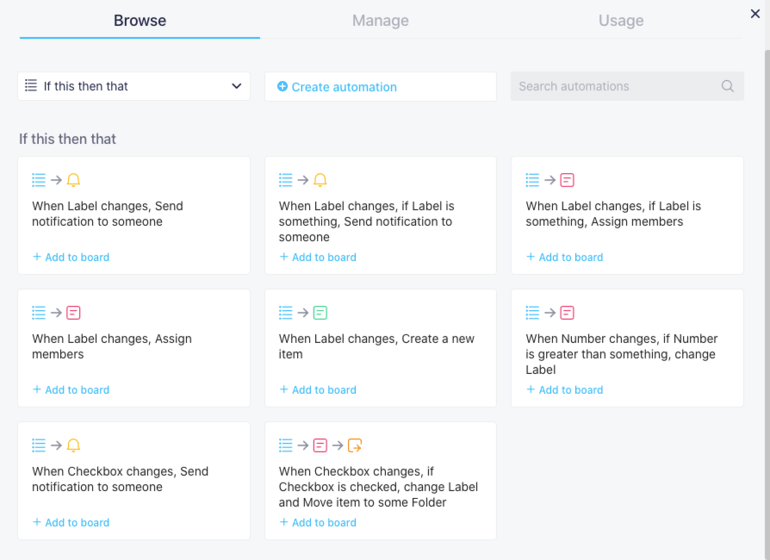
3. Assign Members When Task Status Changes
You can find a whole bunch of useful automations in the If this, then that section, and there are currently 8 pre-made cases you can choose from. In this example, we’ll show you how to set up an automation that will assign selected team members to a task when its status changes to a predetermined label.
How is this useful? If you’re a marketing agency, you can set an automation that assigns a task to your editor whenever one of the writers marks the status of their writing task as finished. Or, if you have tasks that need to be approved, you can use this kind of automation to assign them as soon as they get green-lighted.
- Click the Automations button in the upper left corner of your Infinity workspace.
- From the Browse menu, select If this then that.
- Choose When label changes, if label is something, assign members from the list.
- Pick an attribute from the list (in this case, the Status attribute).
- From the dropdown menus, choose Where status is Approved.
- From the assignee dropdown menu at the bottom, choose people you want to automatically assign to the task.
- Click Save automation.
Conclusion
These three examples are just a small sample of how powerful Infinity automations can be. There are hundreds of possible combinations of triggers, conditions, and actions you can use to your benefit—simply choose pre-made automations from the list or create your own in a few easy steps.
Do you think you’re ready to create your first automation? If you encounter any road bumps, drop us a line at team@startinfinity.com. For more information, check out the Infinity Automations page or our help center. Happy automating!
